Summary
A tutorial of basics of editing content with the default WordPress editor – Gutenberg.
Gutenberg could be a little intimidating at the beginning, especially since it starts with pretty much blank screen, but in the end, I think the developers did a good job. And you have to understand, there is no perfect editor, it’s extremely hard to create a system, that will allow you to create websites in an easy and understandable way, and at the same time, give you enough possibilities that you might need.
Video
The UI – all the buttons
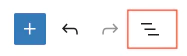
If you are starting with Gutenberg, first thing you want to familiarize yourself with, is the UI. I recommend just clicking everything and seeing what it does. Mainly, the buttons in the left upper corner – Adding blocks, Document Overview, undo and redo. Please do the same with the buttons on the right, especially the right side panel (Settings), which gives you control over the whole document and of the specific blocks you are editing at that moment.
Especially the Document Overview is extremely important, and it’s probably the most important part of the whole system. Without it, the editing is really difficult, I would even say annoying, so, definitely check this magical button.
The Blocks
The blocks are the main part of Gutenberg, you need to understand how to use them, how to edit them and understand the structure. The system is hierarchical, meaning, there could be blocks inside other blocks. That is especially important, if you want to use columns, for example. I think, that the best way to learn, is just trial and error, put some blocks in the content and see, what are the possibilities and what you can do with them.
The Design Blocks
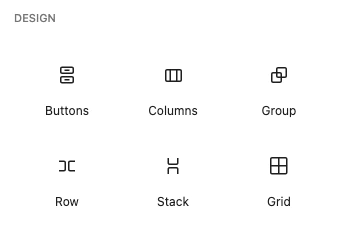
I would say, these are the most important blocks to get yourself familiar with. They allow you to structure your content, place text, images or anything in different parts of the screen. Especially the columns are really essential, so understanding how to use them, is really necessary. You can also use them, to make your content narrower than the rest of your website, to keep up with the 80 character rule, more about that in the Page Width article.
Part of the Design blocks is also the spacer, which allows you to add blank space, an essential part for a good design, please read more about it in the Blank Space article.
Backup and Revisions
Knowing how to go back to a saved version can save you from a lot of stress. In the settings right side panel, there is the magic “Revisions” button. This allows you to go back to saved versions of your content. You can also manually backup your content, by going into the code editor and copy-pasting the code from there. This could also be very useful, if you want to copy-paste your content into a different page or post.
Transcription of the video
Hi! Today I’d like to talk to you about the Gutenberg block system in WordPress.
This video is divided into four parts:
- The UI – all the buttons in the system and what they do.
- How the blocks work.
- A deeper dive into the most important blocks.
- What to do if something goes wrong, or how to back up your content.
I should say that the block system has a bit of a love-hate reputation, which I understand. From a developer’s perspective, it’s much harder to create blocks compared to other systems. And if you’re just starting out, it can feel a bit empty or intimidating. These types of builders always face a trade-off between capability and complexity.
It’s called a block system for a reason—everything revolves around blocks.
Starting from the top left:
- The favicon lets you return to your WordPress dashboard.
- The plus button opens the block library. These blocks can come from WordPress itself, plugins, or even your theme—so the available blocks might differ for everyone.
- Patterns are pre-made groups of blocks, useful for getting started quickly.
- Undo/redo buttons help you go back or forward in your edits.
- Then there’s the document overview—in my opinion, the most essential part of the editor. This should be more visible, because using Gutenberg without it is much harder. Here, you can see a structured list of all blocks on the page and move them around easily. You also have options like duplicating, deleting, or copying blocks.
On the right side, there’s another key button that opens the settings panel. This panel has two sections:
- Page/post settings — including status, URL, author, template, categories, tags, and featured image. These options vary depending on the post type (blog post, page, etc.).
- Block-specific settings — which change depending on the block you’re editing.
Back in the middle is the editor itself. It starts with the title. The editor tries to show what the page will look like on your site, but it’s not 100% accurate. I usually keep a preview of the live page open in another tab to compare.
For this example, I used an “About” page from one of the Minimalio demos about a fictional person named Samuel.
Each block is part of a hierarchy—blocks can contain other blocks. For example, if you want two columns with an image on the right and text on the left, you start by inserting a Columns block. That gives you two equal columns by default (50/50). You can also choose other ratios like 33/66, and it will set widths accordingly.
You can click the small plus icons within columns to add blocks like Heading, Paragraph, Buttons, or Image. You can also adjust vertical alignment, which lets you center content inside the column vertically.
Besides Columns, there are other container-style blocks like Group, Row, or Grid. These don’t contain layout rules by default but are very flexible. It’s best to experiment with them to see what fits your needs.
Every block has settings in two places:
- Inline toolbar above the block (e.g., alignment, link, bold, etc.)
- The right-hand panel (e.g., text color, background, spacing, custom classes)
For example, in a Heading block, you can change the heading level (H1, H2, etc.), move it around, link it, or adjust styling and layout via the sidebar.
Now, let’s talk about text editing. One tip: pressing Enter creates a new Paragraph block, while Shift+Enter just adds a new line within the same block. If you want to convert text into a heading or something else, just change the block type using the toolbar.
If you make a mistake, don’t worry. There are two main recovery options:
- Revisions – WordPress automatically saves past versions. In the page or post settings, you’ll find a “Revisions” link. It opens a slider where you can restore previous versions.
- Code editor – You can switch to the code view, copy all the content, and save it somewhere as a backup. This is also useful if you want to duplicate a page. Just copy the code into a new page and switch back to the visual editor to adjust the content.
That’s basically it! Like I said, the best way to learn is through trial and error. And don’t forget about the document overview—it’s the most important part of the entire editor.
Alright, thanks—and good luck!